
|
|
#1 |
|
Участник
|
stoneridgesoftware: Managing Credit Limits in D365 Business Central and Implementing a Credit Limit Approval Process with Workflows
Источник: https://stoneridgesoftware.com/manag...proval-process
============== Nearly all companies have internal business processes for applying credit limits to their customers to mitigate risk. In Dynamics 365 Business Central you can specify different credit limits by customer while providing the flexibility in how you want to enforce restrictions, ranging from warnings to approval requirements. Let’s walk through setting up credit limits for customers and adding finance visibility via the pre-configured Workflow template in Business Central. To view or update a customer’s credit limits in D365 Business Central, open the customer card and navigate to the General FastTab and locate ‘Credit Limit ($).’ If you do not see it, click “show more” in the top right corner to expand all fields under the General tab. This is where you can view or edit the customer’s credit limit, depending on your permissions. The amount will appear in two different fonts depending on if the customer is over or under their credit limit. (a) If they are under their credit limit, the number will in “standard font” (b) If they are over their credit limit, the number will be in “bold italicized red”  Business Central calculates if the customer is over or under their outstanding balance. The total outstanding balance is determined by: Posted Balance + Outstanding Orders + Orders Shipped Not Invoiced + Outstanding Invoices = Total Balance  Business Central enables you to determine how you want users to be informed when a customer is over their credit limit. To begin, search for and pull up the Sales & Receivables Setup. Under the General FastTab, locate ‘Credit Warnings.’ Within this field, you can determine if you want a notification to display at the top of the Sales Order for: (1) Credit Limits (2) Overdue Balance (3) Credit Limits and Overdue Balance (4) No notifications 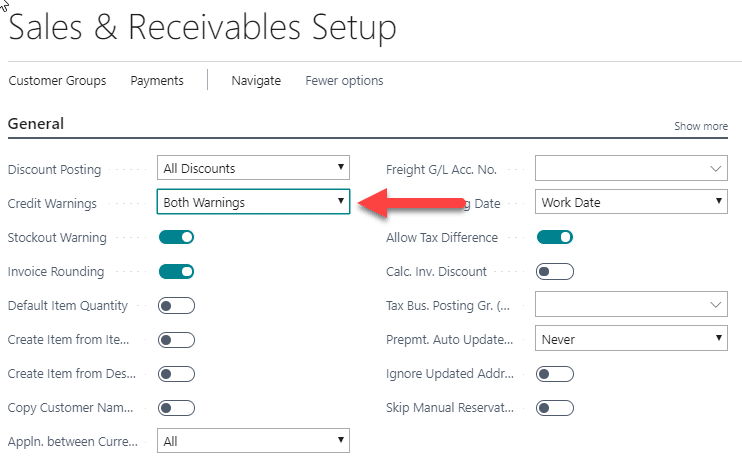 Now that you have added the credit limit amount and configured credit warning notifications, you are ready to complete a Sales Order. In the Sales Order, if a customer is over their credit limit, you will see a notification box on top of the Sales Order once the customer information populates in the Sales Order header. This can also be identified in the Customer Details FactBox with the credit limit amount in bold italicized red font. 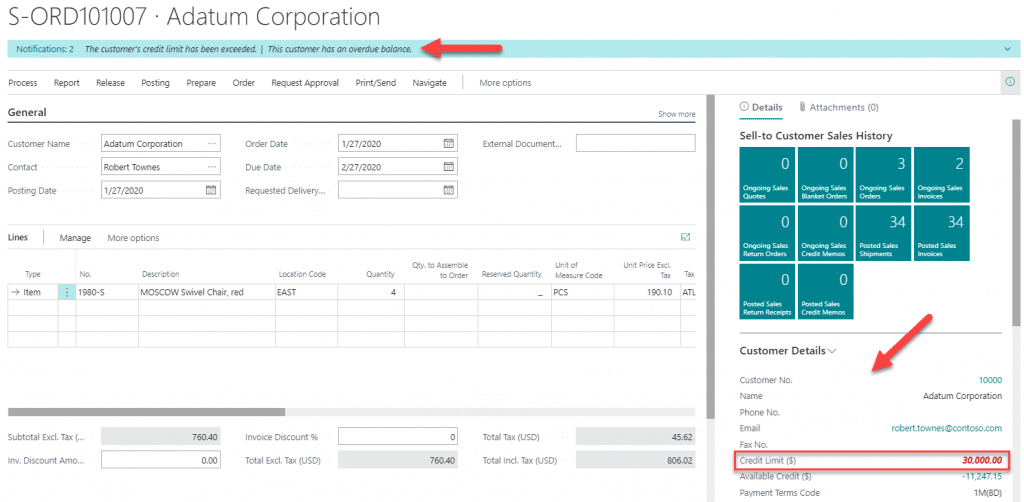 While the visibility by customer card is a good start, entering a credit limit on the customer card will not restrict users from releasing an order even if they are over their credit limit. Some companies will use it as a warning in Business Central and use external business rules and processes when a user comes across a customer over their limit. This typically requires communicating with Finance via spreadsheets and email, where they can review for release approval or denial. Customers can be blocked from shipping, invoice, or from being used altogether in certain cases. In this instance, I have blocked this customer from ordering by updating the customer to “Blocked = All” on the customer card. 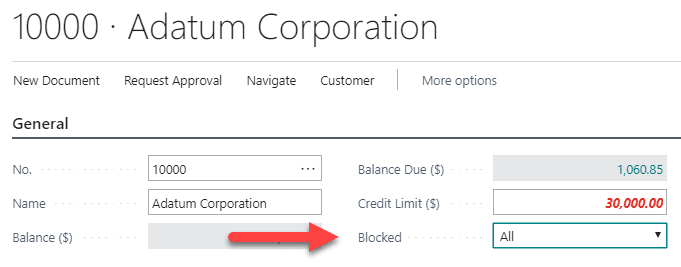 However, to apply checks and lessen the burden of emails to your Finance team, Business Central provides approval functionality by coupling credit limit amounts with configuring and enabling the Sales Order Credit Limit Workflow. To add a Workflow for approvals, search and select ‘Workflows.’ Then follow the menu bar to New>New Workflow from Template. Once selected, scroll to the Sales Documents section at the bottom and select Sales Order Credit Limit Approval Workflow. In this scenario, there will be one primary approver for all Sales Order requests. To add the user, expand the second Then Response for the event when “A customer credit limit is exceeded.” 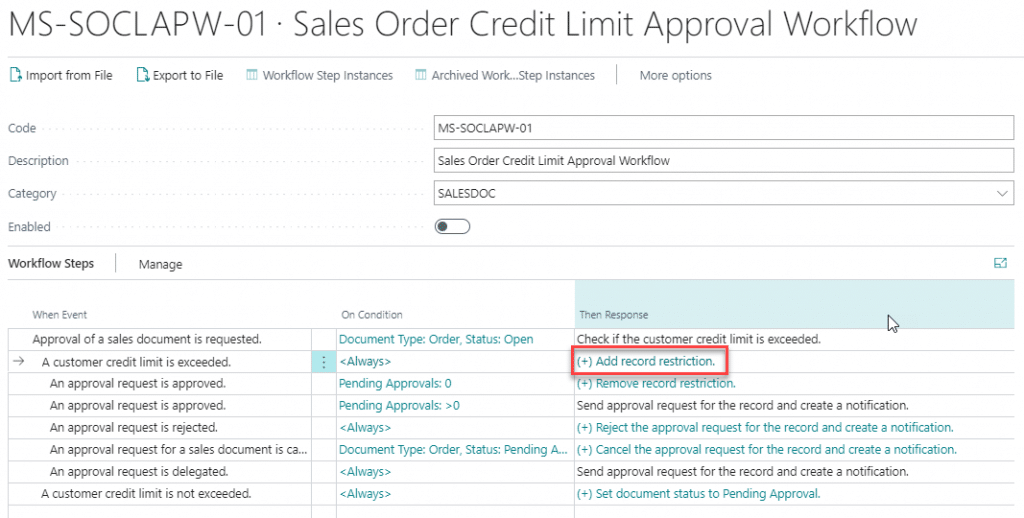 Then navigate to the highlighted Response and complete the Approver information. (NOTE: You will need to add the user in the Approval User Setup) 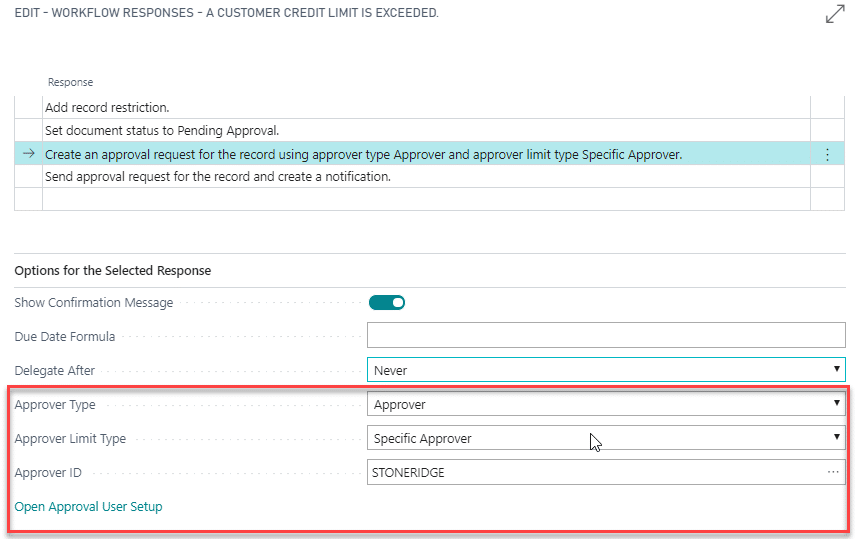 Finally, check Enabled when you are ready to enable the workflow and start approving!  Credit limits are necessary for mitigating financial risk and when leveraged to their full potential in Business Central, can integrate decision making and result in fewer headaches for your Finance department. Be on the lookout for my next installment where I will walk through configuring your approval Workflow to suit your business needs. Источник: https://stoneridgesoftware.com/manag...proval-process
__________________
Расскажите о новых и интересных блогах по Microsoft Dynamics, напишите личное сообщение администратору. |
|
|